
The Sanding Disc Shuffle
10 06 2017
It's not a new dance craze. The Sanding Disc Shuffle is the process of working through the grits with hook and loop sanding discs. I typically start with 80 or 100 grit, then move on to 120 or 150, and if needed will work up to 220 or 320.
Long time readers of this blog know that we are big on dust control, so properly aligning the holes in the sanding disc with the holes in your Random Orbit Sander does make a difference. But when sanding a large number of parts and swapping sanding discs as you work through the pile, this can eat up a lot of time. There is a pretty easy way to help automate this process.
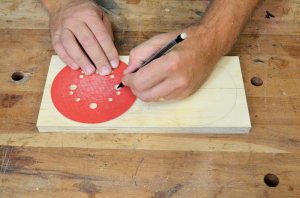
Mark the Sanding Disc holes[/caption]
It is nothing more complicated than a board with some strategically placed dowel pins. The pins hold the sanding discs in place but also function as guides for the sander, insuring hole alignment with every sanding disc change. Start by ripping a plywood scrap a bit wider than your sanding disc, in this case, 6 inches wide for 5 inch sanding discs. Cross cut it to accommodate two or three sanding discs side by side with a bit of space between. This one is for two discs so it ended up 12 inches long, a three disc version should be around 18 inches.
Lay the
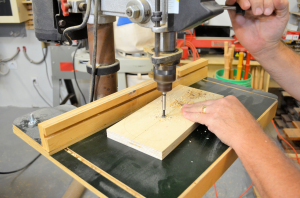
discs out and mark the center of two holes in each disc, then drill 3/8" holes in those locations for a short section of dowel. Glue dowel segments in place so that they protrude only about 1/4 inch above the board face. Taper the top ends of the dowel pins to insure that the sanding discs and the sander can drop smoothly over them. And that is all there is to it.
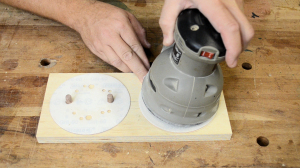
Easily put the sanding disc on the Sander
In use, a sanding disc of each grit being used is placed over the dowels with the hook and loop side up. When switching grits, one disc is peeled off the sander and placed in it's spot back on the board, then the Random Orbit Sander base is lowered onto the dowels holding the next grit in order. The dowel assure the holes in the sanding disc are perfectly aligned with those on the sander and you can get right back to work. On a big sanding job, you should find this trick saves a lot of time and improves your dust collection as well. And no more need to bend over retrieving sanding discs that get knocked to the floor!
We hope you find this tip useful and encourage you to share with us your tips. You can contact us by commenting here on the blog, our Facebook Page, or via Twitter. -2Sand.com
pos