
Sanding Belt Block Sander?
07 02 2015
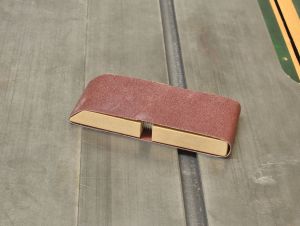
Sanding blocks come in all sorts of shapes, sizes and materials. In past issues of this blog we have shown methods for making custom sanding blocks from auto body filler to packing foam to a deck of playing cards. One type I have seen in use in most every shop I have been in consists of a wood block inside a sanding belt.
Typically, these are pretty crude, just one or two pieces of wood cut to fit inside the belt, and some sort of wedge pressed in to tighten the fit. I have made and used these myself, but they rarely worked as well as desired. Mostly the problem stems from maintaining a tight fit. Sanding belts are made from a loop of cloth backed sand paper joined to itself with special tape forming a belt. So even belts made together as one size vary slightly in actual inside measurement. Sanding belts also do stretch over time and with use which is why all belt sanders have spring-loaded tensioning devices.
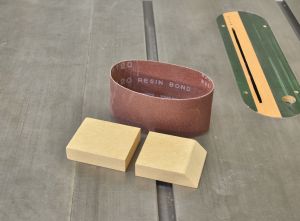
Ideally, the block to fit inside a sanding belt should also have a tensioning system, and we will show you how to do this with inexpensive materials. Our "sanding belt block sander" starts with a piece of 3/4" plywood or MDF, ripped to the width of the belt and cross cut to be about 1/2" shorter than the inside of the belt. This block is then cut in half to accept the tensioning system.
I have made these before with a couple of bolts between the sanding block halves to adjust the overall length, but while it was an improvement over wedges, it was less than optimal. This design will use 3/8" aluminum rods with springs to keep the sanding belt under tension. The rods keep the block halves aligned and the springs apply tension.
Start by marking the block halves on the mating faces, and drill two shallow 1/2" holes in each face. This step is really the only one that

requires any accuracy, you need to insure that the holes line up as precisely as possible. Once the 1/2" holes are drilled, a 3/8" bit is used to drill deeper holes centered on the 1/2" ones, giving you 3/8" holes with a 1/2" counter bore.
In Part 2, we will assemble the sanding block and cover details of getting the fit right. As always, we are interested in your thoughts and opinions of the information we provide. You may comment here on the blog, on our Facebook page, or via Twitter. -2Sand.com