
Lathe Disk Sander Pt. 2
03 06 2011
In our last blog post, we began a series on building a disk sander for your lathe. This week, we continue the series by building the table.

To keep the work properly aligned to the sanding disc, I decided that my table had to clamp onto the lathe bed. The table needs to be large enough to work on, and sturdy enough to not move while sanding. It also needs to be quick and easy to set up and remove.
The dimensions shown fit my lathe set up. Yours may well be different so be sure to verify before you begin cutting. (Plans will be available at the end of this blog series.)
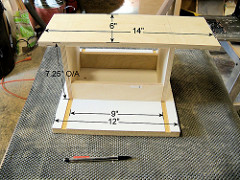
This view shows the table upside down. The top is made from a melamine shelf I had left over. I cross cut it to 14 inches so that it would extend past the sanding disk on each side. The base is baltic birch (any ply will do) cut 6" wide to span the lathe bed rails, and 16" long.
Matching grooves are cut into the table and the base to accept a pair of uprights. The uprights have to be long enough to place the top of the table at the centerline of the disk, in my case, 7 1/4" over all. Note the two stiffeners mounted underneath the top. These keep the table from flexing forward and back. The center section has to be open to allow access for the clamping knobs. Once I was happy with the dry fit, I glued and nailed the plywood components and screwed the Melamine top on.

I cut two more strips of ply for the clamps. I cut them 1 1/4" wide so they will drop between the bed rails of my lathe. They are cut long enough to span the 1 1/2" opening and too long to spin inside the frame. Also note that I added a strip of 1/4" material along the centerline of the base. This fits snugly in between the bed rails of my lathe and aligh the table to the lathe. Holes were drilled to accept two 5/16th" carraige boltsthrough the clamp blocks and the base.

To set the table, lower the clamp blocks in between the bed rails, and slide the table forward until there is a small (1/16") gap between the table and the disk. Tightening the knobs will tend to turn the blocks inside the bed rails. Because they are too long to spin inside the frame, they will catch the underside of the rails and draw tight.

Secure both clamps and you are ready to begin sanding!
I was very pleased with the way this system turned out. It provides a stable platform for sanding, and the large disk coupled with variable speed allows for complete control over my work. In the next post, we'll look at options for adding a fence and/or stops for precision work.

We invite your comments here on the blog, on our Facebook page, or via Twitter. Let us know what you think!