
Downdraft Sanding Cabinet Pt 4
01 10 2012
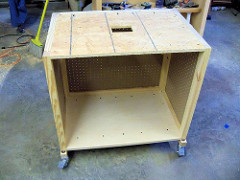
Whew, the holidays are over! Don't get me wrong, I enjoyed mine, and hope you enjoyed yours too, but all that partying and visiting really cuts into the shop time. I will admit to not getting as far as I would have liked with the Downdraft Sanding Center over the last few weeks, but I did manage to get wheels mounted and the doors ready to mount.
For this project, I chose some better quality casters. I am not so concerned about the weight rating, even four cheap casters at 150 lbs each will handle more than I can lift onto the table. But a sanding center will vibrate a lot and certainly will be pushed from side to side as we sand the edges of parts and such. So I wanted to use casters that locked not only the wheel, but also the swivel. I got a set of four with 1/2" dia threaded studs for about $40.00

The stud was not long enough to reach all the way through the base frame, so I counter bored the holes and secured them. This was done before finally attaching the base frame. Now the cabinet is complete and can be easily moved around as I continue work. I have avoided building the top because all of this work on the cabinet is a lot easier without the big top.
The final step on the cabinet itself is to make and attach the doors. The doors are frame and pegboard panel, and are built exactly like the sides and back of the cabinet were, but with thinner stock.
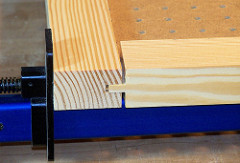
I milled the stock at 3/4" thick and used the same stub tenon technique to glue them together. A couple pair of simple hinges are all that is needed to hang the doors. In the next installment, we will create the "egg crate" structure that makes up the center of the torsion box top.
I certainly invite you to add your thoughts or send along ideas that have worked well for you. Please feel free to add your comments here on the blog, on our Facebook page, or via Twitter. Let us know what you think! -2Sand.com